After paying a massive amount of money, one anticipates that there would be no problem with an iPhone or iPad. However, this is often retorted by some commonly occurring problems. One commonly occurring problem that Apple users might experience is iTunes could not connect to the iPhone because an invalid response was received from the device.
In this article, I will explain how to fix iTunes Could Not Connect to the iPhone error in a very simple manner. This problem is related to iTunes so we will also take a quick look at the needed information related to it.
iTunes Could Not Connect to the iPhone Because An Invalid Response Was Received From The Device
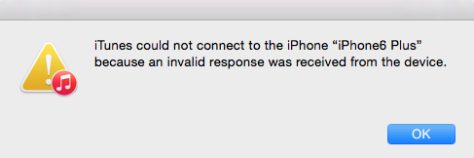
This problem commonly occurred in iPhone 6/7/8/X or iPad but it may also appear in the older versions too. However, the older or, the obsolete versions of iPhone are often protected against this error but I would suggest that you upgrade soon. Though that is another debate. Let’s come back to our topic for now which is iTunes sync issue after updating to new iOS 10, 11, 11.1 or 11.2 which has a error message reading “iTunes could not connect to the iPhone because an invalid response was received from the device.” as shown in the above image. This problem occurs when you try to connect your iPhone to your PC to sync data. It may occur on both Mac and Windows systems. In Windows PC, it looks like this: 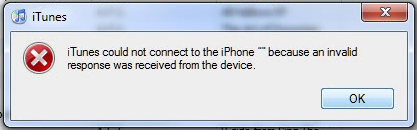
Cause for this iTunes Issue
There are several causes that lead to this iTune’s syncing issue. The most common and major ones are:
- Outdated iOS version.
- Outdate version of iTunes.
- Problematic USB cable or port.
- Incorrectly configured settings.
- Virus, spyware or malware.
- A third-party app or software like antivirus, etc.
However, you don’t need to worry about the reason as I will provide you solutions that will fix the problem regardless of the cause.
How to Fix iTunes Could Not Connect to the iPhone
You learnt about a number of reasons as of why the iTunes’ syncing issue may occur. Likewise, there are a number of solutions available too. You don’t need to apply them all, just try them one by one until one resolves your issue.
If you wish and has a message coming from your instinct, you can try any method selectively too. No great knowledge is required, just follow the step-wise guide below every method and it will solve your problem. Before using any of the solutions, restart your iPhone and PC and then check if the issue still appears.
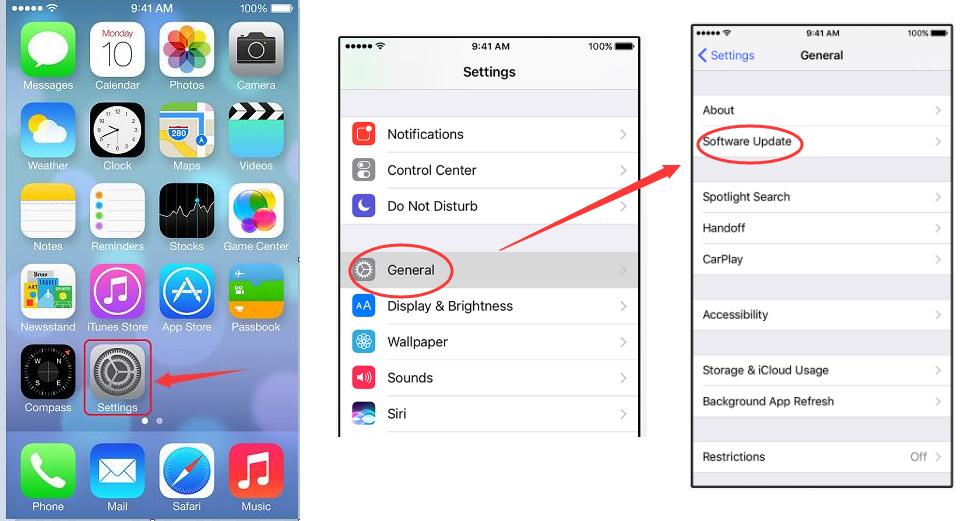
1. Update iPhone OS
Updates are provided in order to improvise the overall functioning and security of the device. However, we have of a habit of ignoring them most of the times. Updating iOS to the latest version is the easiest way to solve this and other certain issues. If your iPhone is already updated to the latest iOS version, you can skip this method. If not, follow these steps:
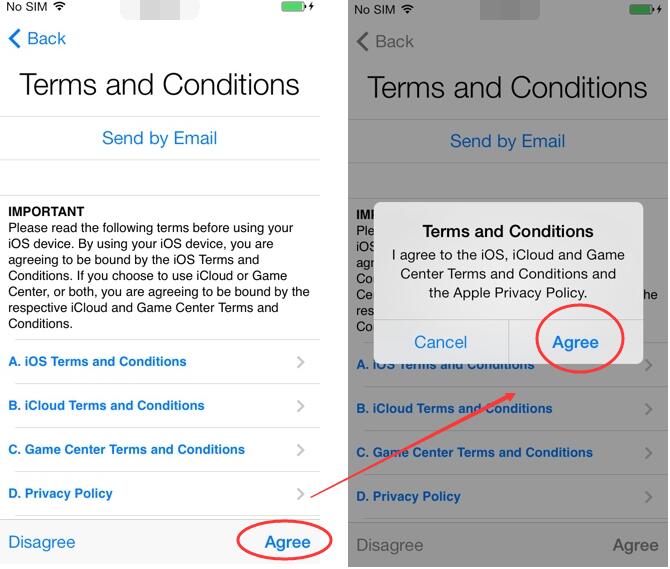
Step-1: Open your iPhone and go to Settings. Now go to General and then go to Software Update.
Step-2: Now tap on Download and Install. If it asks your password, enter it.
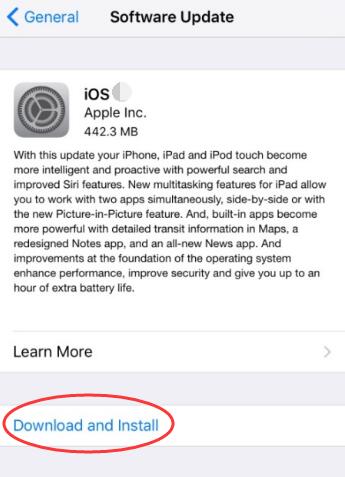
Step-3: Finally, tap on Agree and then the downloading will start. Wait patiently till the process is complete and then check if you have solved the problem.
Done. This might have solved your problem. However if the problem still persists, scroll down to try the next method.
2. Update to Fix iTunes Could Not Connect to the iPhone Problem
If the updated iOS failed to solve your problem, updating the iTunes app might work for you. Follow these steps in order to update the app and eventually resolve the issue:
Step-1: Launch iTunes in your iPhone. Go to Help and then to Check for Updates.
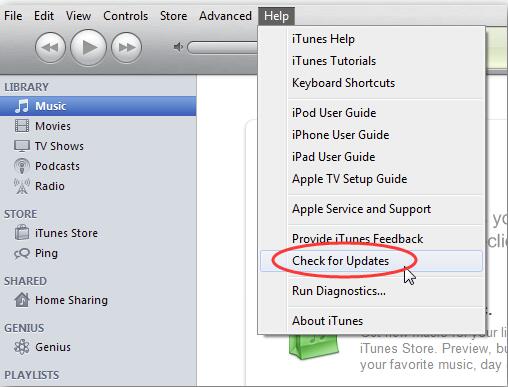
Step-2: If an update is available for iTunes, follow the instructions appearing on your screen to update the app. Albeit if your app cannot be updated anymore, uninstall it and then re-install.
Step-3: Check if you have solved the problem.
Done. This might have gained you relief. Although if the problem is still there, move to the next method.
3. Fix Itunes Error by Resetting Network Settings
Sometimes incorrectly configured settings cause certain issues. This method works on the principal of resetting the iPhone Network Settings to default. This the simplest and most accurate method. Follow these steps in order to reset Network Settings:
Step-1: Open your phone and go to Settings. Now go to General and then to Reset.
Step-2: Tap on Reset Network Settings.
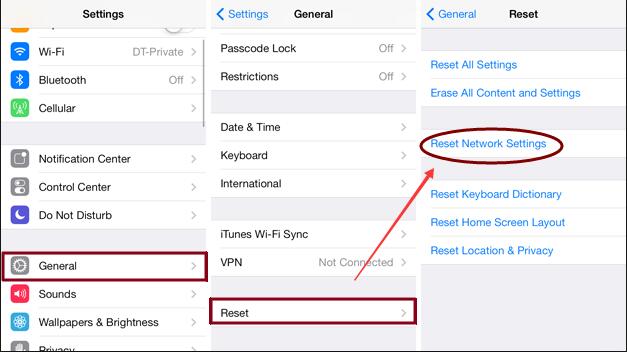
Step-3: Check if there is any problem when syncing data from iPhone to PC.
Done. This way you have solved the problem just by resetting Network Settings. If you are still experiencing an issue, move further down to the next method.
4. Check Other Things
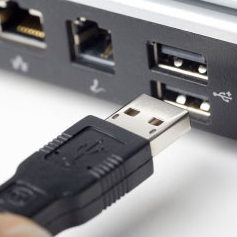
Step-1: Try some another USB cable and also use another USB port.
Step-2: Check if your iPhone is unlocked or locked. If it is, unlock it using Face ID or password.
Step-3: You can also reset Lockdown folders but I would NOT suggest you do so as it may harm your data.
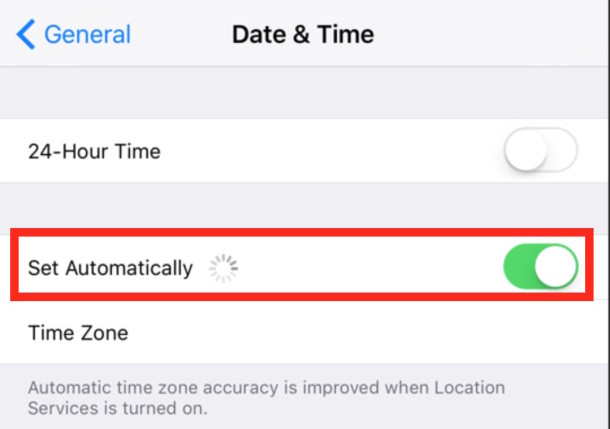
Step-4: Check if the Date and Time Settings are set to Automatic. If they aren’t, change them to Automatic.
Step-5: You can also disable the antivirus program installed in your computer as sometimes it is the one creating conflict. Though I would NOT suggest you to do so as it puts your computer at risk.
Done. These may solve your issue in some cases. If you have solved the problem is, have fun. If it isn’t, scroll down and try the ultimate method.
5. Update Drivers
This is the ultimate and best method in order to fix the device not recognized issue. I will explain you how to update Apple Mobile Device USB driver. Follow these steps to learn how to:
Step-1: Disconnect your iPhone from the computer and then reconnect it. If iTunes opens, close it.
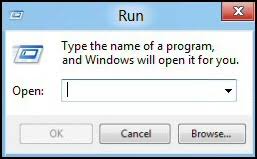
Step-2: Press the Windows + R key to trigger Run dialog box. Type %ProgramFiles%\Common Files\Apple\Mobile Device Support\Drivers in it and hit Enter.
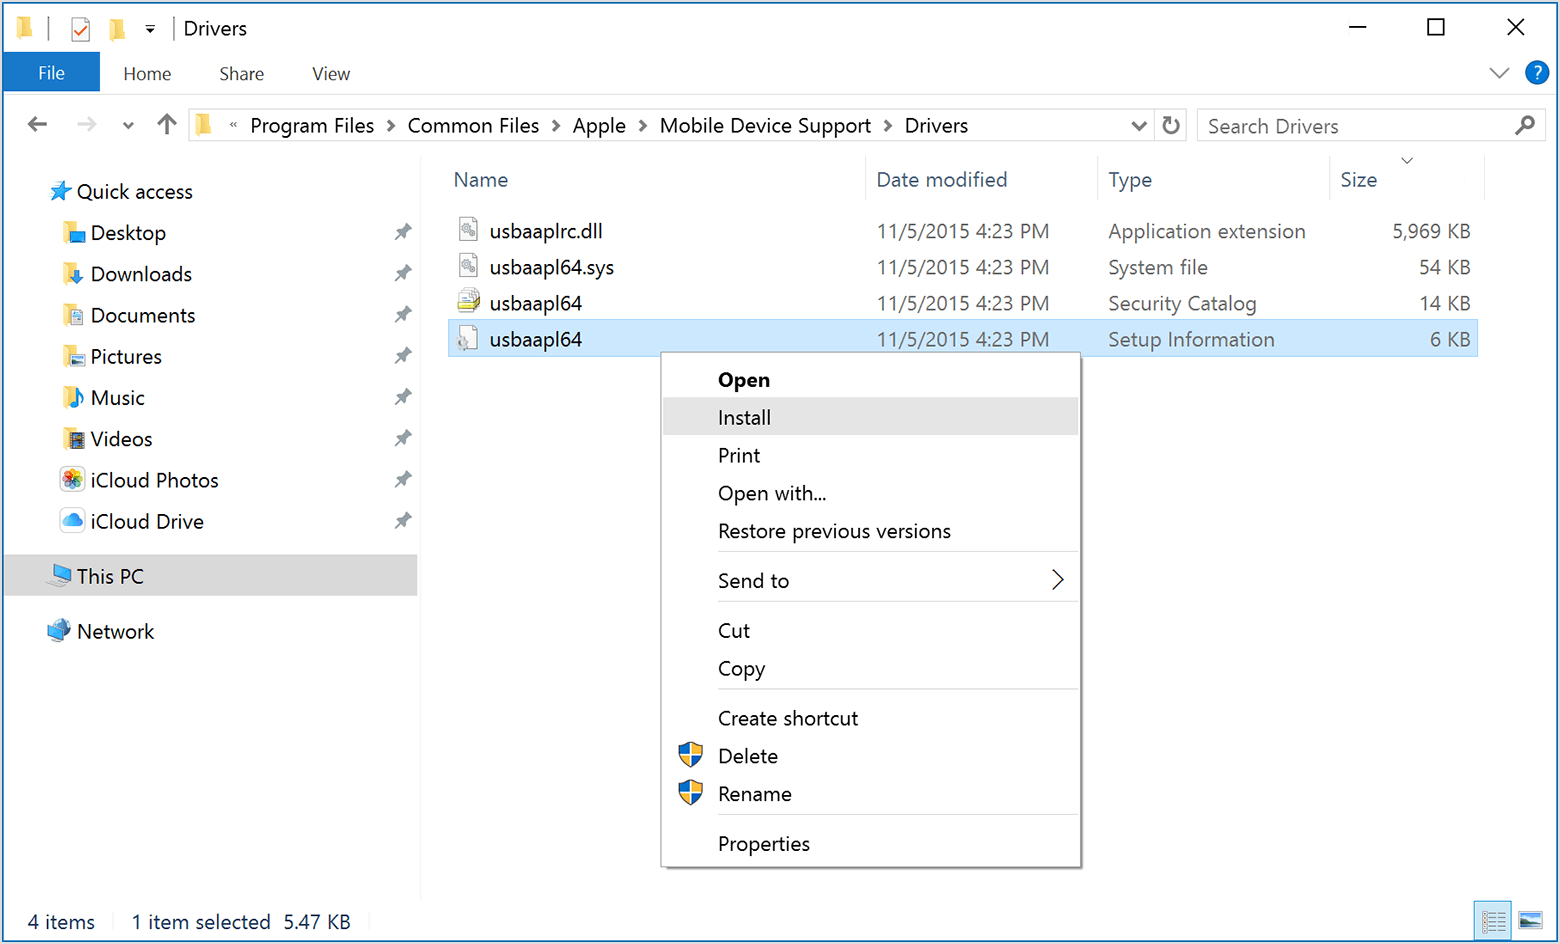
Step-3: Now just right click on the file usbaapl64.inforusbaapl.inf and then click on Install. You will see other files starting with the same name too but remember to only click on the file ending with .inf .
Step-4: Disconnect your device from the computer and then restart your PC. Now reconnect your device to the computer and open iTunes.
Step-5: Now check if you have solved the problem. If it is, you can stop scrolling. However if the problem is still there, scroll down to Step-6 and Step-7 and perform them.
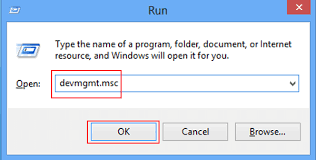
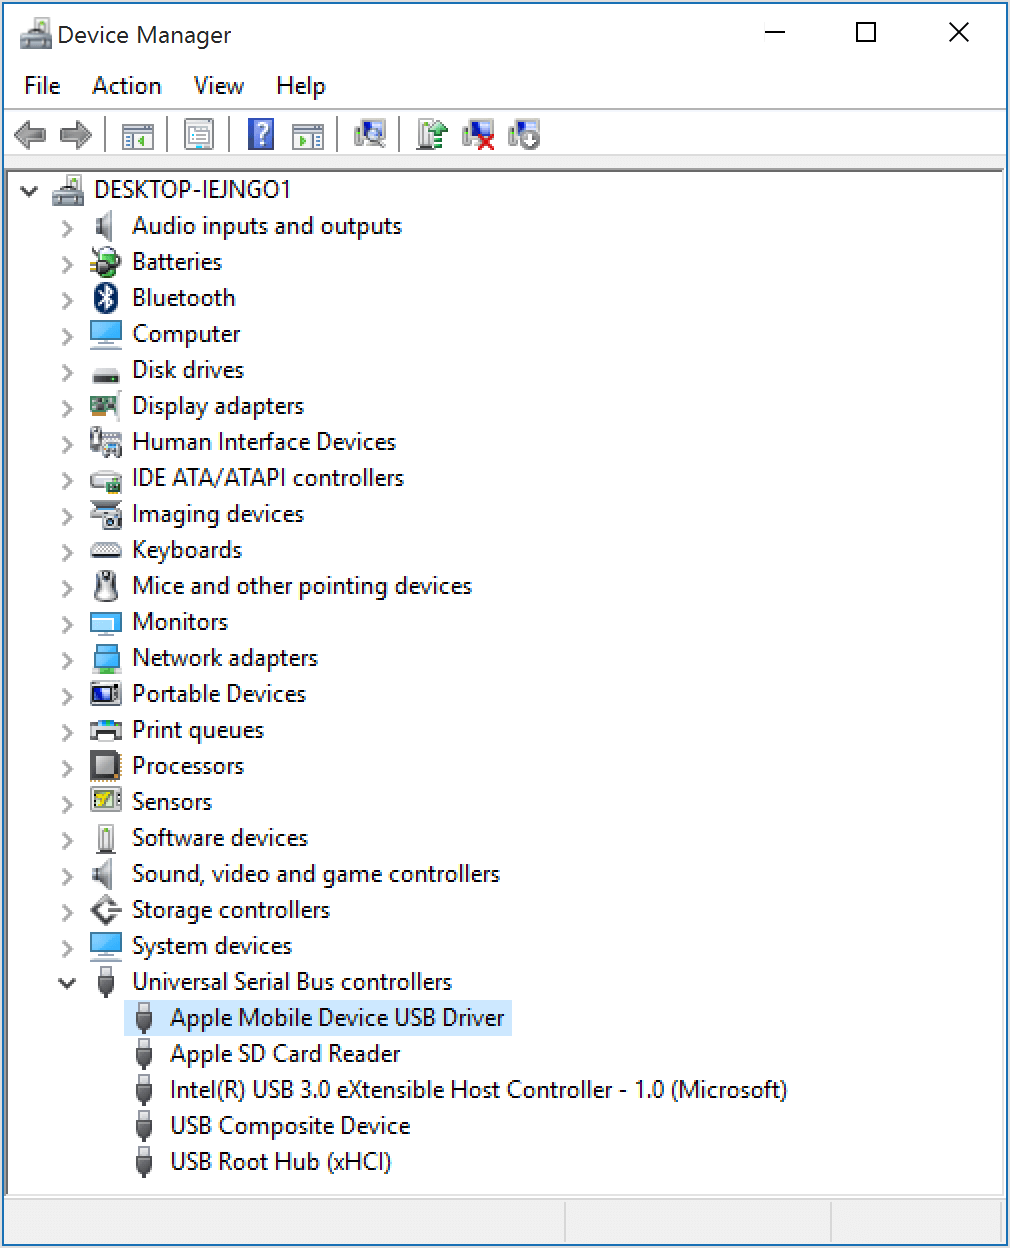
Step-6: Press the Windows + R key to access Run dialog box. Type devmgmt.msc in it and hit Enter.
Step-7: In the Device Manager, locate and expand the Universal Serial Bus controllers section and then select the Apple Mobile Device USB driver.
Conclusion
These were the tried and best available methods to solve the “iTunes could not connect to the iPhone because an invalid response was received form the device” problem. If any of them worked out for you, you can freely sync data between your iPhone and your PC. You can also go through the official Apple Support Thread related to this problem. Hope I helped you to solve the problem. For any queries regarding the topic, comment down in the comments section below. Have a nice day, Folks!
![How to Backup iPhone Photos [5 Methods] – 2024 Guide](https://www.digitalcare.top/wp-content/uploads/2018/08/0-211x150.png "How to Backup iPhone Photos [5 Methods] – 2024 Guide")

