Personal computers are available in virtually every part of the world that has any kind of modern civilization. They are used in commercial and household setting for various purposes to improve the lives of the human race. MacBook Pro is considered one of the leading there are brands in the computer manufacturing industry. In this article, you will be told about the ways to Format MacBook Pro.
Like any other machine, they are subject to breakdowns. Whenever a computer is affected by a stubborn virus, the Operating system isn’t working properly or you have a memory problem, certain ways to format MacBook Pro are usually recommended.
3 Methods on How to Format MacBook Pro
There are multiple ways to Format Macbook Pro, here are 2 of the easiest methods with all the steps given in detail.
Simply follow the step by step guide to clean format your Macbook Pro.
1. Erasing the Drive and Installing OS X
The process of formatting a computer depends on the Operating system it runs on. There are many variations of how to format a MacBook Pro. The most secure and easy method involves following these steps:
- The first step is turning on the computer. The computer must be completely off before you attempt to power it on (not the “sleep mode” option).
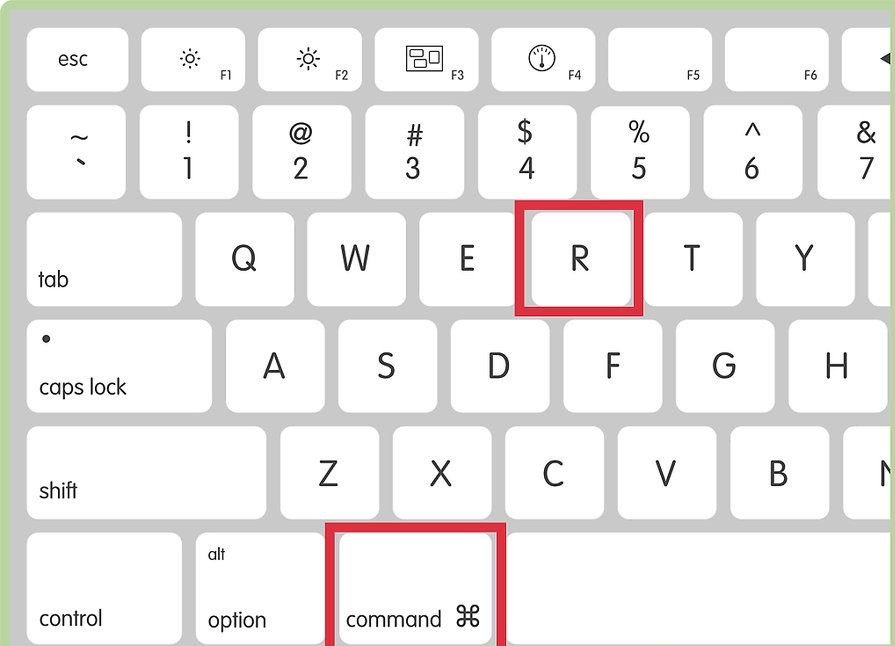
- Press and hold command, options and R key right after you hear the startup sound. An Apple logo is expected on the screen. This process reveals the formatting and Recovery options.
- Release the Keys when a Window appears asking you about internet options.
- You can select the type of internet connection to use during the process. Select the option on the basis of internet connection that is available. Formatting and reinstalling Mac Operating system requires an internet connection.
- Click on the “Disk utility” option from the Recovery Menu. A new window will appear, on which you select the “Continue” option.
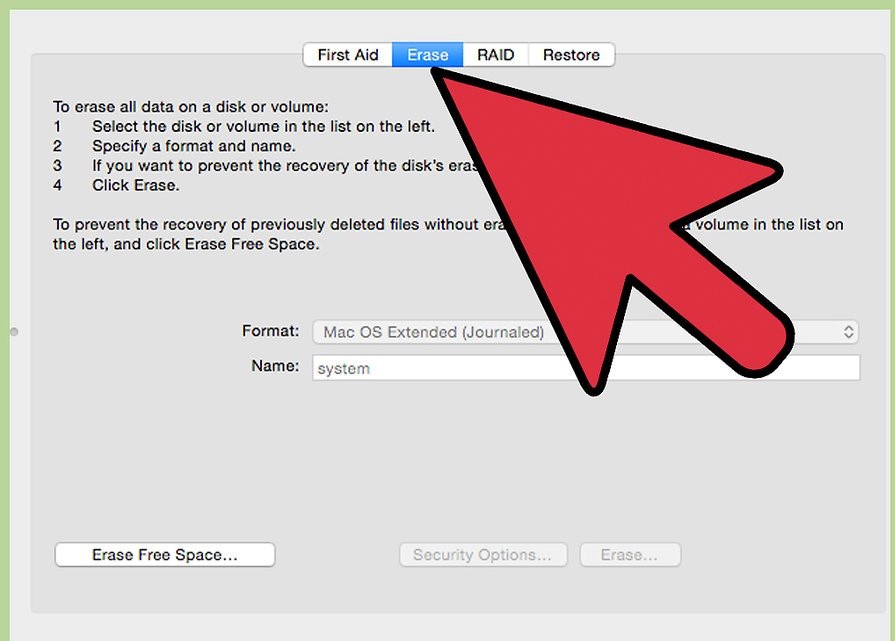
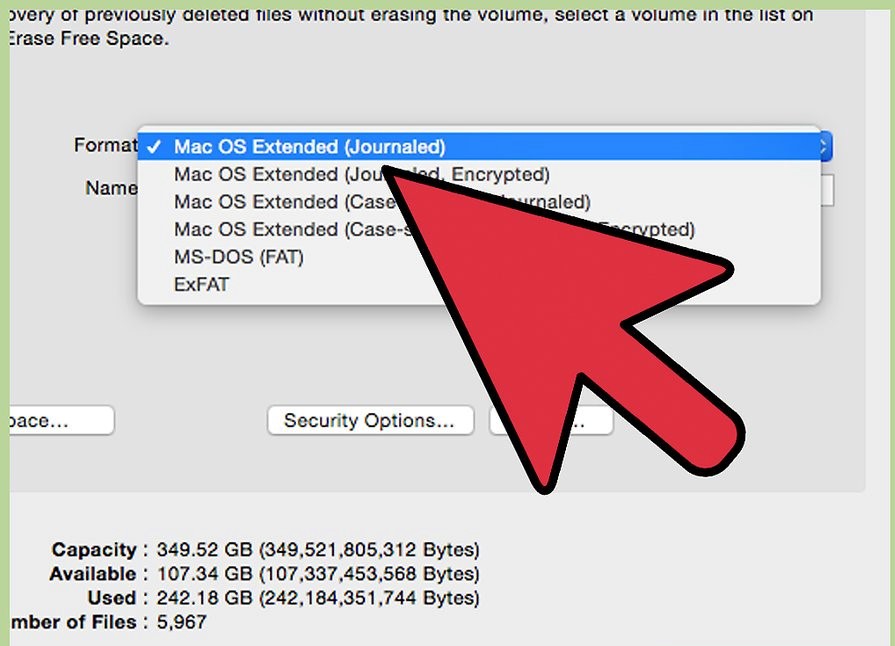
- In the Disk Utility window, click on “Startup Disk” and “Erase” buttons and select the Mac OS Extended (Journaled) version. This drop-down menu allows you to select a custom version of the OS.
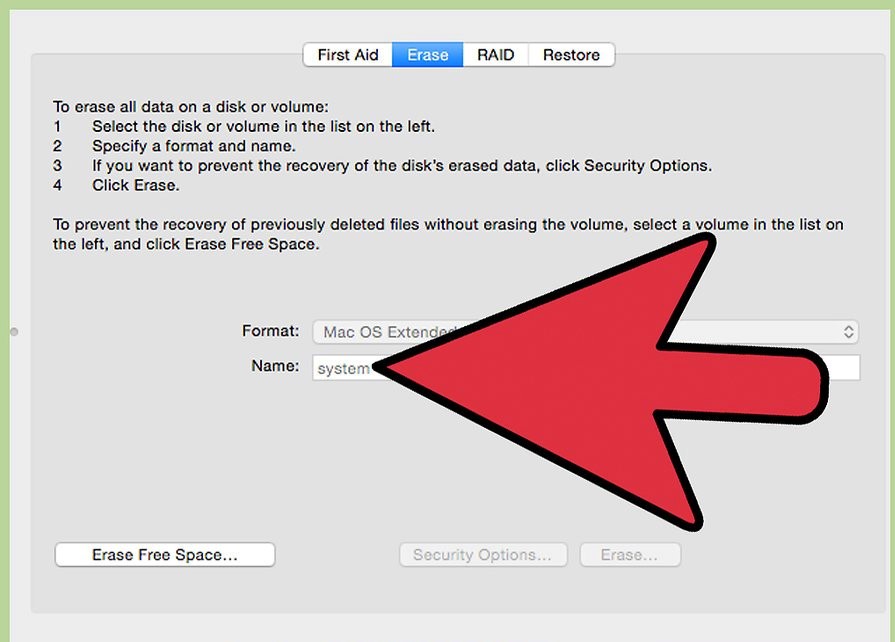
- You can then provide the name for the disk and proceed to erase. This performs the formatting and erases the disk.
- Minimize or close the Utility disk and from the recovery menu select “Reinstall OS X”.
- Press continue on the window that appears and you are good to go.
- This method is easy to execute and results in a PC with a current version of the Operating system after formatting is complete.
2. Recovering from a Time Machine Backup
- The first step is turning on the computer. The computer must be completely off before you attempt to power it on (not the “sleep mode” option).
- Press and hold command, options and R keys right after you hear the startup sound. An Apple logo is expected on the screen. This process reveals the formatting and Recovery options.
- Release the Keys when a window appears asking you about internet options.
- You can select the type of internet connection to use during the process. This is dependent on the type of internet connection that is available. Formatting and reinstalling Mac Operating system using Time Machine Backup requires an internet connection.
- Choose “Restore from Time Machine Backup,” and then click on “Continue.”
The method will only work if you had earlier backed up your MacBook system using the application Time Machine. In a case that you have never maintained a backup using this application, Time Machine, then follow the other steps explained in Methods 1 or 3 of the article as methods to format MacBook Pro and reinstalling OS X.

- Pick your Time Machine backup disk, later choose the Time Machine backup you wish to restore. If you wish to format MacBook Pro with the help of this method, this method will reinstall OS X, along with your personal documents. For an instance, when you format MacBook to invert the impacts of a virus, choose a Time Machine backup which was maintained before the installation of the virus on your MacBook system.
- Click on “Continue” to follow the instructions shown on-screen for the reinstallation of OS X along with your personal documents. When it gets completed, your MacBook Pro system will be formatted including the reinstallation of OS X as well as recovery of your personal data.
3. Reinstalling OS X from Recovery
- The first step is turning on the computer. The computer must be completely off before you attempt to power it on (not the “sleep mode” option).
- Press and hold command, options and R keys right after you hear the startup sound. An Apple logo is expected on the screen. This process reveals the formatting and Recovery options.
- Release the Keys when a window appears asking you about internet options.
- You can select the type of internet connection to use during the process. This is dependent on the type of internet connection that is available. Formatting and reinstalling Mac Operating system X requires an internet connection.
- Choose “Reinstall OS X” from the Recovery menu, and then click on “Continue” to proceed.
Final Words
Just follow the instructions on the screen of your system to reinstall OS X on MacBook Pro system. Your system will lead you within the installation method, and soon you will be assisted to pick the hard disk where you wish OS X to be installed. Once completed, on your MacBook Pro system OS X would have been installed as fresh and you will get your personal files recovered in no time.
![How to Put iPhone in DFU Mode [For All Models] – 2024 Guide](https://www.digitalcare.top/wp-content/uploads/2019/01/dfu-211x150.jpg "How to Put iPhone in DFU Mode [For All Models] – 2024 Guide")
![Gmail Not Working on iPhone [Full Fix]](https://www.digitalcare.top/wp-content/uploads/2019/09/1-3-211x150.png "Gmail Not Working on iPhone [Full Fix]")
