A Mac user may meet certain cases where he might need to record audio on their Mac system. It may be to record a voice note, a Skype call, a video conference or any other cases where recording the sound is needed. However, not every Mac user is familiar with recording audio on Mac. Therefore, assuming that you are here to learn. I will explain briefly How to Record Audio on Mac, both the external and internal ones.
How to Record Audio on Mac from your Mic
External Audio means any type of sound such as vocals, musical instruments, simple notes, etc that can be introduced into your Mac PC using a microphone (either built-in or an external microphone). Most of the Mac operating systems are bundled with an inbuilt microphone (except Mac Mini and Mac Pro) which can be used to record audio.
However, the quality will be not-so-good in this case. So, I’d suggest you get a better quality dedicated audio device like a USB Microphone. Now let’s move forward with learning to record audio on Mac. There are two ways possible to record the external sounds on Mac. One is to use the inbuilt app Quicktime. The other is to use a good third-party app. I will explain both the methods in required details.
1. Record Mic Sound on Mac using QuickTime

QuickTime is thought of as a movie viewing application, but surprisingly it has video, screen, and audio recording capabilities as well. This app is an inbuilt wonder for all the Mac users. Mac doesn’t have any Voice Memos app like the iPhone, so QuickTime is a good choice without downloading any additional software. QuickTime can easily record sound input from a microphone and save it as a lightweight m4a file. It is perfect for recording quick voice notes, capturing conversations, recording sound effects, making simple ringtones or any other basic audio recording task. Follow these steps in order to learn how to record audio using QuickTime:
Step-1: Firstly open QuickTime player. You can find it in the /Applications/ folder.
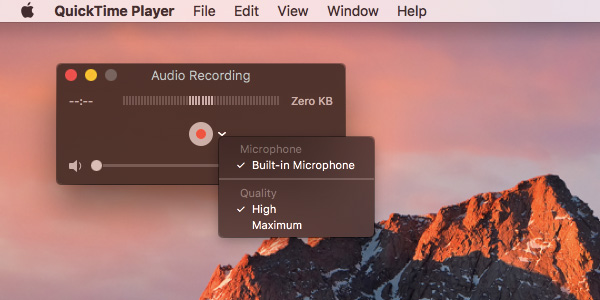
Step-2: Now click on the File button to pull down the Menu and then select New Audio Recording.

Step-3: Then click on the Red Recording button present in the center of the Audio Recording box. The recording will start then. When you have to finish the recording, click on the same Red button.
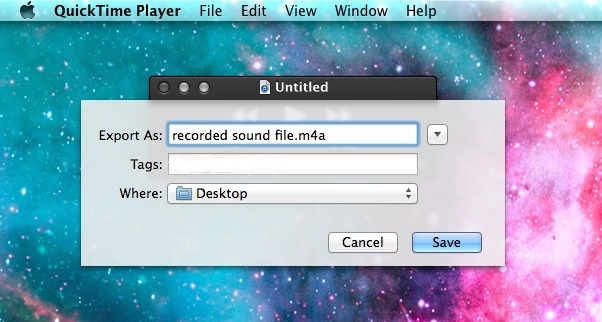
Step-4: Afterwards, go to File menu and then choose Save. Then name the file and select the path to store the file.
This way you can record any type of audio on your Mac using QuickTime and save it for future use.
2. Record Audio on Macbook using Third-Party Apps

There are several third-party apps available to record audio on Mac like Audacity, WireTap Studio, Audio Hijack Pro, etc. Audacity is the best option present among them as it is completely free and pretty powerful. It supports audio recording and you can also edit the recorded clip as well. Follow these steps in order to record audio using Audacity:
Step-1: Download and install Audacity from here. Afterwards, open Audacity.
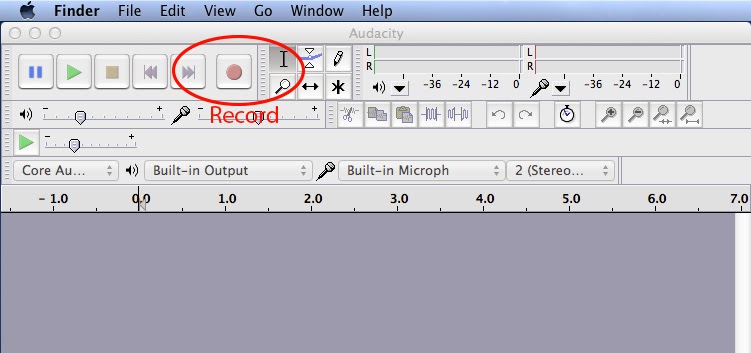
Step-2: Here also, to start recording sound click on the Red circle-shaped button. The recording will begin then and it will use the default microphone.
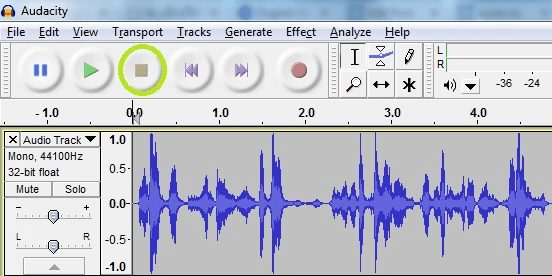
Step-3: After you have finished recording your audio, click on the brown square-shaped button to stop the recording.
Step-4: Go to File menu and Export & Save the file.
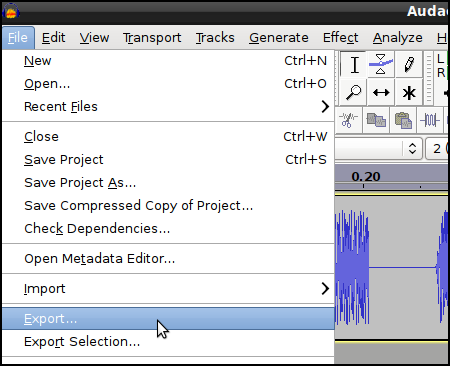
The recorded file will then be saved for future use. You can also edit the clip using Audacity.
How to Record Audio (Internal) on Mac?
Internal audio means the audio that your Mac is playing back, such as an internet stream, song or a Skype call. Recording Internal audio is a little different as it’s not audio we can just simply input into the Mac with a microphone. Mac has no inbuilt app to record what is being played on the speakers. Therefore, you have to use an additional third-party app to record the internal sounds of the computer. There are several apps available to do this like Soundflower, Movavi, Piezo, etc. Soundflower and Movavi are the best options among them. I will explain the procedure of using them in detail.
1. Record Computer Audio on Mac using Soundflower
Soundflower is an amazing audio capturing app for Mac users. It is completely free and simple to use. When a sound is playing on your computer, Soundflower acts as a source to convert it as if it is coming from an external device. This way it makes it possible to record the playing sound. Follow these steps in order to record audio using Soundflower:
Step-1: Download and install Soundflower from here. Your mac will have to restart then.
Step-2: After your PC has restarted, you have to set SoundFlower as your Output Device. To do so, open System Preferences, select Sound and then set Soundflower (2ch) as your Output device. Now any sound that will play on your Mac will not come out from the speakers, instead, it will be routed through Soundflower.

Step-3: Now you have to use Quicktime to record the sound routed through Soundflower. Go to Quicktime, click on File and then select New Audio Recording.
Step-4: In the Audio Recording box, click on the inverted-triangle present on the right side of Red recording button. Now in the resulting Menu, select Soundflower (2ch).
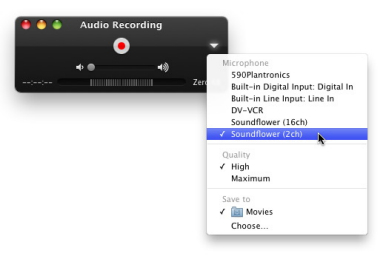
Step-5: Play any sound and when you are ready to record it, click on the Red Record button in Quicktime.
This way you can use Soundflower to record the sounds playing on your Mac.
2. How to Record Audio on Mac using Movavi

Movavi Screen Recorder is an audio recorder that will help you capture any type of audio on your Mac, including internal system sounds, online streaming audio, Internet audio players, Skype calls, and radio. It is a great app capable of recording both internal and external sounds. Follow these steps in order to record audio using Movavi:
Step-1: Download and install Movavi from here. Afterwards, open Movavi Screen Recorder.
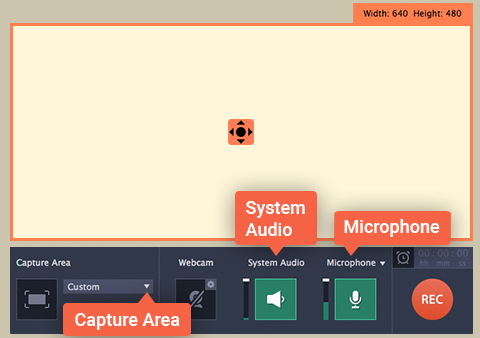
Step-2: System Audio recording is activated by default in Movavi (If you want to record the external audio along with the internal one, activate Microphone input recording by clicking on the Microphone button. To start recording audio, click on the Rec button.
Step-3: After you have finished recording, click on the Stop button.
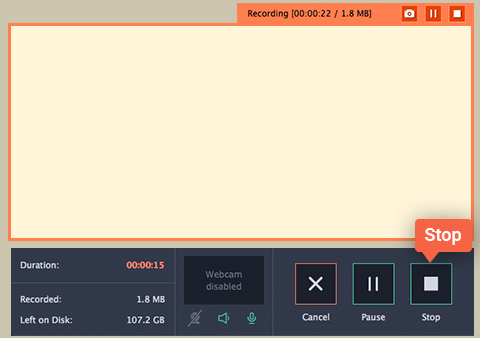
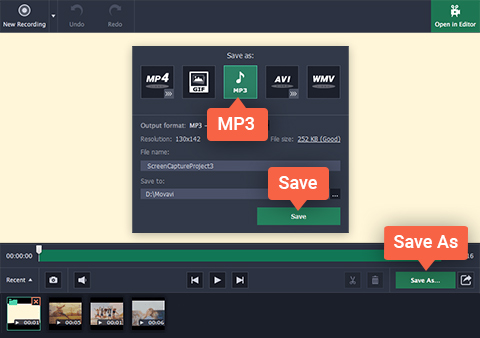
Step-4: Now click on the Save as button, select Mp3 to save the file in Mp3 format and then click on Save to save the file for future use.
This way you can record any type of internal or external audio on your Mac using Movavi.
Summary
These were the best possible ways to record audio (both internal and external ones) on Mac. All the apps listed above are properties of their respective owners. Though they are free to use. You can try them anytime you wish. I’m concluding this article by assuming that you now know how to record audio on Mac. Hope I helped you to learn recording audio on Mac. For any queries, doubts or suggestions, comment down in the Comments section below. Have a nice day, Folks!
![How to Backup iPhone Photos [5 Methods] – 2024 Guide](https://www.digitalcare.top/wp-content/uploads/2018/08/0-211x150.png "How to Backup iPhone Photos [5 Methods] – 2024 Guide")

