Nowadays many people use Notes to write important things or tasks of which they can make use of any time in the future. I myself keep notes of topics to write my future articles or any other task and also recommend my friends to do the same. Also, I have synced my notes with Mac and iPhone using the iCloud to more ease. Now, have you been noting down some important tasks or work in the Notes app of your iPhone and you want them to be on your Mac? If that is the case and you are not able to sync notes from iPhone to Mac then you are reading the correct article. This article would help you import all the notes from the iPhone to your Mac and keep sync on both the devices for the future.
Since you are an Apple customer, I am assuming that you have iCloud and Apple ID set up on your iPhone and Mac devices already. I expect that by the end of the article, you are able to sync all the notes you want from iPhone to Macbook.
How to synchronize notes between iPhone and Mac?
Now there are a few easy methods that you can follow and get your notes synced on iPhone and Mac. Like the first method would explain you to sync notes using iCloud, the second method would share the notes using email and the third method would do that using Airdrop. So, I will be explaining them one by one below and you may choose any of them that suits you.
1. How to sync notes from iPhone to Mac with iCloud?
You can easily add notes or sync notes to your iCloud account. Now, if you add notes or sync notes to your iCloud, then you can automatically access all of your notes from any device using your Apple ID. Now the steps to add notes or sync notes to your iCloud are as follows:
- Go to the Settings app on your iPhone and select your Apple ID.
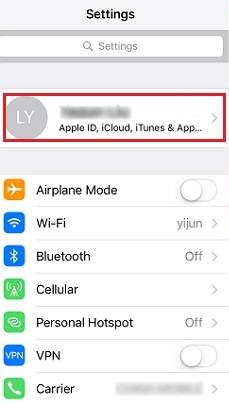
- Now, click on the iCloud account.
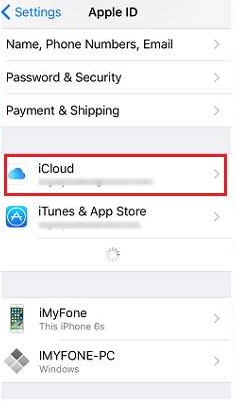
- If not logged-in then log in using the username and password.
- Now, turn on the Notes toggle from the list.
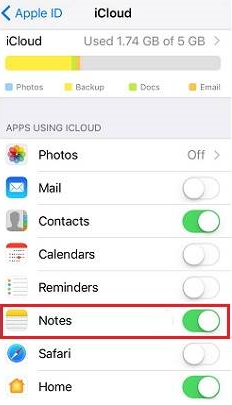
- Open your mac device and launch the Notes app.
- Choose the option to save notes in iCloud.
- Open the folder where your Note is stored on iPhone.

- Now, click on File and choose the Import to Notes option.
- Select the file or folder and click import.
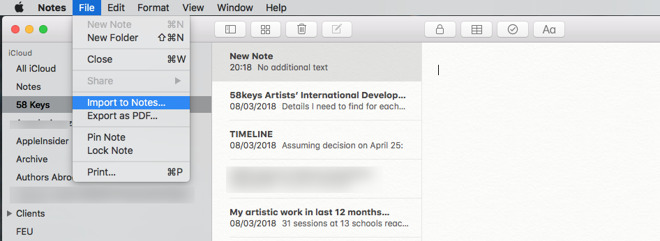
- Click on Import again if prompted for permission.
Done, your notes are synced between your iPhone and Mac device by now. You can write notes on iPhone and edit later on Mac anytime you want. So, this is the easiest way you can add notes from iPhone to Mac but there are a few more methods to add notes to Mac.
2. Transfer Notes from iPhone to Mac with Email
Now, here in this step, you would be able to get the complete note to your Mac using the help of an E-mail like Gmail, Yahoo or whichever email service you use. So, the steps are:
- Open the Notes app on your iPhone.
![]()
- Open the note that you want to share through email.

- Click on the share option now from the top right corner.

- Choose the Mail option.
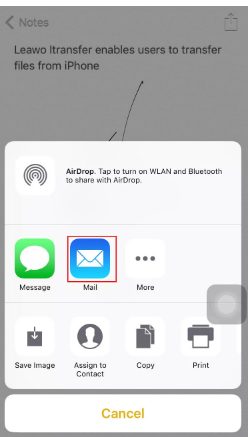
- Enter or select the mail you want to share the note with.
After you press the send option on the mail application then just after a few seconds you can use the same account and access the notes that you want. You can use any email platform like Gmail, Yahoo, Rediffmail or any other mail service that you are using
3. Import Notes from iPhone to Mac with Airdrop
The step is easy and would not even take more than a minute to transfer your notes to the Mac from your iPhone. The Airdrop app must be pre-installed on your iPhone and should be kept updated for better benefits. It is just that you have to turn ON the Airdrop services beforehand on both of your devices i.e. iPhone and Mac. After that you should try the steps below:
- Open the notes app on your iPhone.
![]()
- Now, choose the note that you want to share.
- Click on the share option from the top-right corner.
- Now, a pop-up will appear with all sharing options including Airdrop.
- Click on the Mac device you want to share the note with.
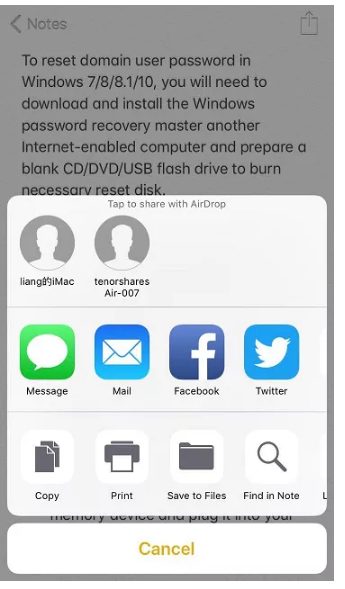
- Now, on your Mac, a pop-up will ask you to accept or decline to receive the file.

- Click on Accept and you will receive the file.
Hence, you have received your note on your Mac using the Airdrop option and you can make the best use of it. The Airdrop shared one file at a time when the last time I used it and so, would recommend you to opt for the iCloud method if it still has the same feature and you want the sync to happen at a faster rate.
If you are still facing any difficulty using the Airdrop service to share notes from iPhone to Mac then you may read this article.
Conclusion
So, the article shares with you three methods to share notes or sync notes from your iPhone to your Mac device over the internet. One uses the iCloud to share the notes, the second uses an email to share the same and the third uses the Airdrop application to share the notes. You can use any of the above method and sync notes from iPhone to Mac device. The methods are all easy to follow, though if you are facing any issue then you may ask your query by commenting below. Also, suggestions are welcomed from your side that would help others.
![Fix Macbook Keyboard Not Working [3 Methods] – 2024 Guide](https://www.digitalcare.top/wp-content/uploads/2018/10/1200-macbook-keyboard-trackpad-211x150.png "Fix Macbook Keyboard Not Working [3 Methods] – 2024 Guide")
![Fix iTunes Songs Greyed Out Issue [5 Easy Ways]](https://www.digitalcare.top/wp-content/uploads/2019/08/4-5-211x150.jpg "Fix iTunes Songs Greyed Out Issue [5 Easy Ways]")
