Size of files is a key aspect in a Mac user’s life. The best possible way to manage storage and transmit data on Mac is compressing and decompressing files. There are many other benefits of zipping and unzipping files, we’ll talk about them too. This guide will help to clear all the mist you have about zipping your files on Mac. In this post, I’ll explain how to zip a file on Mac in the simplest manner. And yes, also how to unzip the file back again.
After learning this, you’ll no longer be worrying about huge not-so-important files occupying a huge amount of space. You can easily compress them, and later decompress when you need it. Compression is also a good way to manage the security of confidential data. Let’s talk all these briefly.

What is a Zip/Compressed File on Mac?
Before moving to find the answer to our main question- How to zip a file on Mac, we should take a quick look at the answer of what is a zip file. Knowing about things is good in order to learn them better. Basically, Zip/Compressed files are the replica of the original files that are smaller in size. These come really handy when you want to upload/download a file or just want to store it.
One more major advantage of compressing a file is that you can protect it with a password so that your confidential data doesn’t leak to the wrong hands.
These files can be created in two ways- 1) By eliminating redundancies in the files, which can later be recreated. This type of compression is termed as lossless compression. 2) By cutting out unimportant bits, although at the cost of a perfect replica. This is known as lossy compression. Zipped files are packed into various archive formats like ZIP and RAR. When you have a compressed file, you can’t access it until you unzip/decompress it. I’ll teach that too.
How to Zip a File on Mac
Now let’s come to question-in-focus: How to make a zip file on Mac? It is actually very simple and easy. Mac OS X has a built-in utility to compress files. So, you don’t have to seek help from third-party apps, or add-ons. You can just use the inbuilt utility to compress or decompress, in other words, zip or unzip a single file, a group of files, or an entire folder. You just have to own a Mac, have a file to compress, and know how to zip a file on Mac. That’s all you need right now.
I’ll guide step-by-step what you have to do in order to zip a file using your Mac. Follow these steps:-
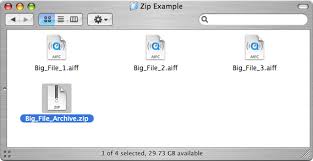
Step-1: Open Finder on your Mac and locate the file you want to zip.
Step-2: Right-click on the file you want to zip and select Compress “XYZ”. XYZ is the name of the file here.

Step-3: A zip file will be created in the same folder and file name but with “.zip” extension. You can store, share or unzip it. The time taken to create a zip file from the original one depends upon the size of the file.
Done. You have now learned to zip a file on Mac.
How to zip multiple files on Mac
What if you need to compress multiple files into a single archive? Don’t worry, the built-in utility of Mac is capable of doing that too. Follow these steps in order to compress/zip more than one file on Mac together:
Step-1: Open Finder on your Mac and select all the files you want to compress.
Step-2: Right-click on any of the selected files and select Compress X items. X is the number of files here.
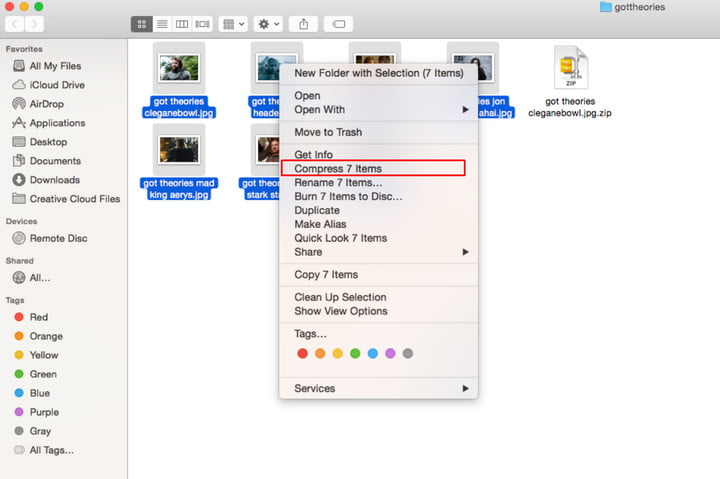
Step-3: A single Archive.zip file will be created in the same folder then. You can unzip it whenever you need to access the original files.
Great. After learning how to zip a file on Mac, you have now learned how to zip multiple files on Mac too.
How to Unzip a File on Mac?
Knowing to only zip a file is not enough. You must know how to unzip or decompress a ZIP, RAR or any other compressed file. So that, whenever you need to access it, you can open it in the original form. A system utility known as Archive Utility is used for this purpose. It is able to unzip almost all the formats of zip files. Follow these steps in order to unzip a file on Mac:
Step-1: Open Finder and go to the folder where the zipped file is.
Step-2: Now either double-click on the file and Archive Utility will be launched to open it, or right-click on the file, choose Open with and select Archive utility.
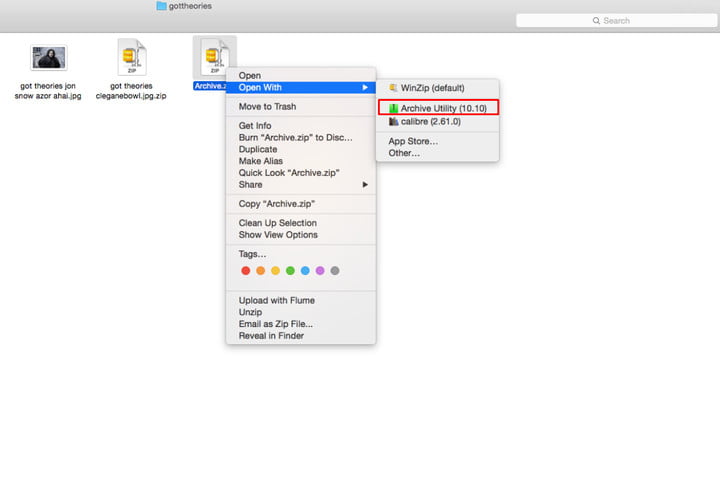
Step-3: The unzipped file will be saved in the same folder where the archive or compressed file was present. You can move it to a new directory if you want.
That’s it. You now know how to unzip a file on Mac, along with knowing how to zip a file on Mac.
The Best Third-Party App to Unzip Files on Mac- Unarchiver
Using third-party apps is always a good idea when you know which one is the best, safest and most reliable option. There are many apps present in the Apple Store to decompress files on Mac, but my personal favorite and the best considered one among them all is- Unarchiver.

The Unarchiver is a light and simple to use program that can decompress many different kinds of compressed files. It can open common formats like Zip, RAR (also including v5), 7-zip, Tar, Gzip, and Bzip2. You can also open many older formats, such as StuffIt, DiskDoubler, LZH, ARJ, and ARC with Unarchiver. It can even open other kinds of files, like ISO and BIN disc images, and some Windows.EXE installers. This software tries to detect and correctly handle the filename encoding in the archives it opens. This allows you to open files from every part of the world without getting distorted filenames.
Download Unarchiver from here.
Conclusion
That’s all you need to learn. Now you know how to make zip files on Mac, how to zip multiple files on Mac, how to unzip a file on Mac, and the best app to unarchive files. Share your views or queries about this post in the comments section. Hope I helped you.

![Password Protect any Folder on Mac [Quick Methods] – 2024 Guide](https://www.digitalcare.top/wp-content/uploads/2018/09/mac-3-211x150.jpg "Password Protect any Folder on Mac [Quick Methods] – 2024 Guide")
![How to Keep Your iCloud Files Secure [5 Ways]](https://www.digitalcare.top/wp-content/uploads/2019/12/icloud-100708260-orig-211x150.jpg "How to Keep Your iCloud Files Secure [5 Ways]")